Create a new project
To create a new project, use the project.create command at the root of your codebase.
scratch/main> project.create myProjectThis will create a new, empty project with the name, myProject with a main branch inside of it as a default. Your console will look something like this:
myProject/main>See also:
Create a project from an existing library with releases
If your existing namespace is a mature library with main, latest, and releases namespaces, you'll will...
- merge the
mainsubnamespace into themainbranch of the project - Create a branch called
/latestwith thebranchcommand and merge thelatestnamespace into it - Each release is a branch with the special form
/releases/releaseVersion. Each of the released version namespaces are merged into their respective branches.
Create a project from an existing namespace
Say you have simple un-versioned namespace that you want to turn into a project. First, create a new project with the project.create command.
scratch/main> project.create myProjectThen, merge the namespace into the project with the merge command.
myProject/main> merge .myExternalNamespacefork a namespace from outside of a project into a project. You must use the merge command.See also:
List all projects in your codebase
To list all projects in your codebase, use the projects command.
scratch/main> projectsRenaming a project
To rename a project, use the rename.project command from within the project you're trying to rename.
myProject/main> rename.project myNewProject
myNewProject/main>
Renaming a branch
Renaming a branch follows the same pattern
myProject/feature1> rename.branch myNewBranch
myProject/myNewBranch>
Switch between branches or projects
The switch command is used to change between branches or projects.
Both of these commands will switch to the default main branch of the otherProject. The absence of a slash preceding the argument to switch means that the UCM will look for a project to switch to.
myProject/aBranch> switch otherProject
myProject/aBranch> switch otherProject/main
Switching to a contributor branch of another project contains the contributor's Unison Share handle in the branch name.
myProject/aBranch> switch otherProject/@contributor/contributorsWorkTo switch to a branch within the same project, omit the project name, leaving slash and the branch name to indicate that the argument is a branch. The slash can help distinguish a branch name from a project name when there is a project with the same name as a branch.
myProject/aBranch> switch /anotherBranch
myProject/aBranch> switch anotherBranch
Create branches
To create a new branch, use the branch command with one or two arguments. You might create branches to work on a new feature in one of your own projects, or to contribute to a project that you've cloned. Branches have a parent-child relationship, so the new branch will be a child of the current branch.
Branch arguments are optionally preceded by a slash to disambiguate them from other codebase entities. This creates a copy of the main branch in aNewBranch and switches to it.
myProject/main> branch /aNewBranchYou might also see branch arguments prefixed by the contributor's Unison Share handle.
myProject/main> branch /@contributor/aNewBranchYou cannot otherwise have multiple slashes in a branch name.
myProject/main> branch /myNewBranch
@unison/base/main> branch /myNewFeature
It is also possible to create a branch with two arguments. The first is the source, or parent branch, and the second is the new branch being created.
myProject/main> branch /srcBranch /destBranchList the local branches of a project
To view the branches of a project, use the branches command.
myProject/main> branchesThis shows the local branches and their remote mappings (if any) on Unison Share.
Currently you cannot view the remote cloned instances of your project.
Delete a project or a branch
To delete a project use the delete.project command. This will delete the project from your local codebase.
myProject/main> delete.project myProject
scratch/main>
Deleting a branch can be done with the delete.branch command. This will delete the branch from your local codebase.
myProject/main> delete.branch /myBranchDeleting a project from Unison Share
You can delete a project from Unison Share by heading to your project's settings page.
Install a project as a dependency
To install a project as a dependency, use the lib.install command in the UCM. The lib.install command will add the project to your lib directory.
myProject/main> lib.install @user/projectThis command can be copied into your clipboard from the Unison Share UI when you click the "Use Project" button on a project page.
If you want to install a specific version of a project, specify the version like this:
myProject/main> lib.install @user/project/releases/1.2.3How to update a library dependency
Upgrading a library is very similar to the regular process of updating Unison code. It involves one additional simple command. The following workflow uses Unison's standard library, base, as an example.
Upgrade workflow:
lib.installthe latest version of the dependency into your codebase so that it is a sibling of your current library version.myProject/main> lib.install @unison/base
- Run the
upgradecommand, indicating which library you'd like to upgrade myProject/main> upgrade unison_base_1_0_0 unison_base_2_0_0
- Run the
- The UCM will create a new branch for the upgrade to take place in, so if something goes wrong and you want to back out of your changes, you can easily switch back to the branch you were on before the upgrade.
- If there are conflicts to resolve, the UCM will open up the affected terms in your editor. Resolve the conflicts and enter
updateagain once the file typechecks. - Run
upgrade.committo merge the temporary branch created by theupgradecommand back into its parent branch. It will delete the temporary branch.
Clone a project from Unison Share
Cloning is used to download a project or branch for contributing to it. (To install a project dependency, use the pull command.) Unlike with Git workflows, where you clone a project and can download all the project's branches (stale or otherwise,) in Unison you clone specific branches of a project.
To clone a project from Unison Share, use the clone command. The first path segment is the user's Unison Share handle and the second is the name of the project.
scratch/main> clone @unison/projectNameUnless otherwise specified, the cloned project will only include the main branch.
Clone a branch of a project from Unison Share
If you want to clone a branch other than main, use the same clone command but include the branch name after the project name.
scratch/main> clone @unison/projectName/branchIf you already have the project locally, but wish to clone an additional branch from the remote repository, you can leave off the project name prefix.
@unison/base/main> clone /releases/2.0.0Branches may also include a path segment for the contributor's Unison Share handle, indicating that the branch is a contributor branch.
scratch/main> clone @unison/projectName/@contributor/branchPush a project or branch to Unison Share
To push a project or branch to Unison Share, use the push command.
Pushing a project to Unison Share automatically establishes a remote mapping between your local project and the project on Unison Share. We can even run push with no arguments on a project that we own.
myProject/main> push

Pushing to https://share.unison-lang.org/@myuser/myproj/branches/main...
You can also push a specific branch to Unison Share. The following command will push someOtherBranch to the main branch of the project.
myProject/main> push @myUser/myProject/main /someOtherBranchYou can still push a namespace to your public namespace in Unison Share, but if you push a project to Unison Share, it will get special UI treatment and functionality, like branch based browsing and versioning.
Merges for projects
The merge command is used to combine branch contents or namespace contents. You might merge a namespace into a branch as a part of moving your code into a project, or you might merge two branches together as part of a pull request. The existing ability to merge two namespaces together is still supported as well. Let's look at each of these cases.
Preview a merge
Before performing a large merge you may want to view the terms that will be changed with the merge.preview command
myProject/main> merge.preview /featureBranch
myProject/main> merge.preview /featureBranch /otherBranch
This will produce a list of terms that will be changed. You can view this list in the UCM or in the browser.
Merging two branches together
To merge two branches together, your arguments can be prefixed with a slash, / indicating that they are branches.
myProject/main> merge /featureBranch
myProject/main> merge /featureBranch /featureBranch2
If you're reviewing a pull request, the contributor will have created a branch for their work. Their branch will start with their user handle from Unison Share.
myProject/main> merge /@contributor/featureBranch
myProject/main> merge /@contributor/featureBranch /featureBranch2
You can also merge a different project's branch into your project's current branch by supplying the full project name as an argument.
myProject/main> merge @unison/differentProject/featureBranchMerging a namespace into a branch
From within the project, you can merge a fully qualified namespace into the current branch, by calling merge with one argument, or specify a target branch with the optional second argument to merge.
myProject/main> merge .feature.from.namespace
myProject/main> merge .feature.from.namespace /featureBranch
Publishing a release of a project
Releases are like immutable snapshots of a given branch. They do not contain the history of the project so other libraries can depend upon them without using additional space in their codebase.
There are two ways to create a release of a project, the recommended option is to use the Unison Share UI to create a release, and the other is using the release.draft command.
Creating a release from the Unison Share UI
If you are intending to create a release using only the Unison Share UI and you'd like to associate release notes with the new version, make sure your ReleaseNotes document term is up to date with the latest changes to your library. Push main up to Unison Share and head to the "releases" tab for the project.
Click the "Cut a release" button to open the release version modal.
You'll have some options for how to version the next release. Increment your release by one major, minor, or patch version.
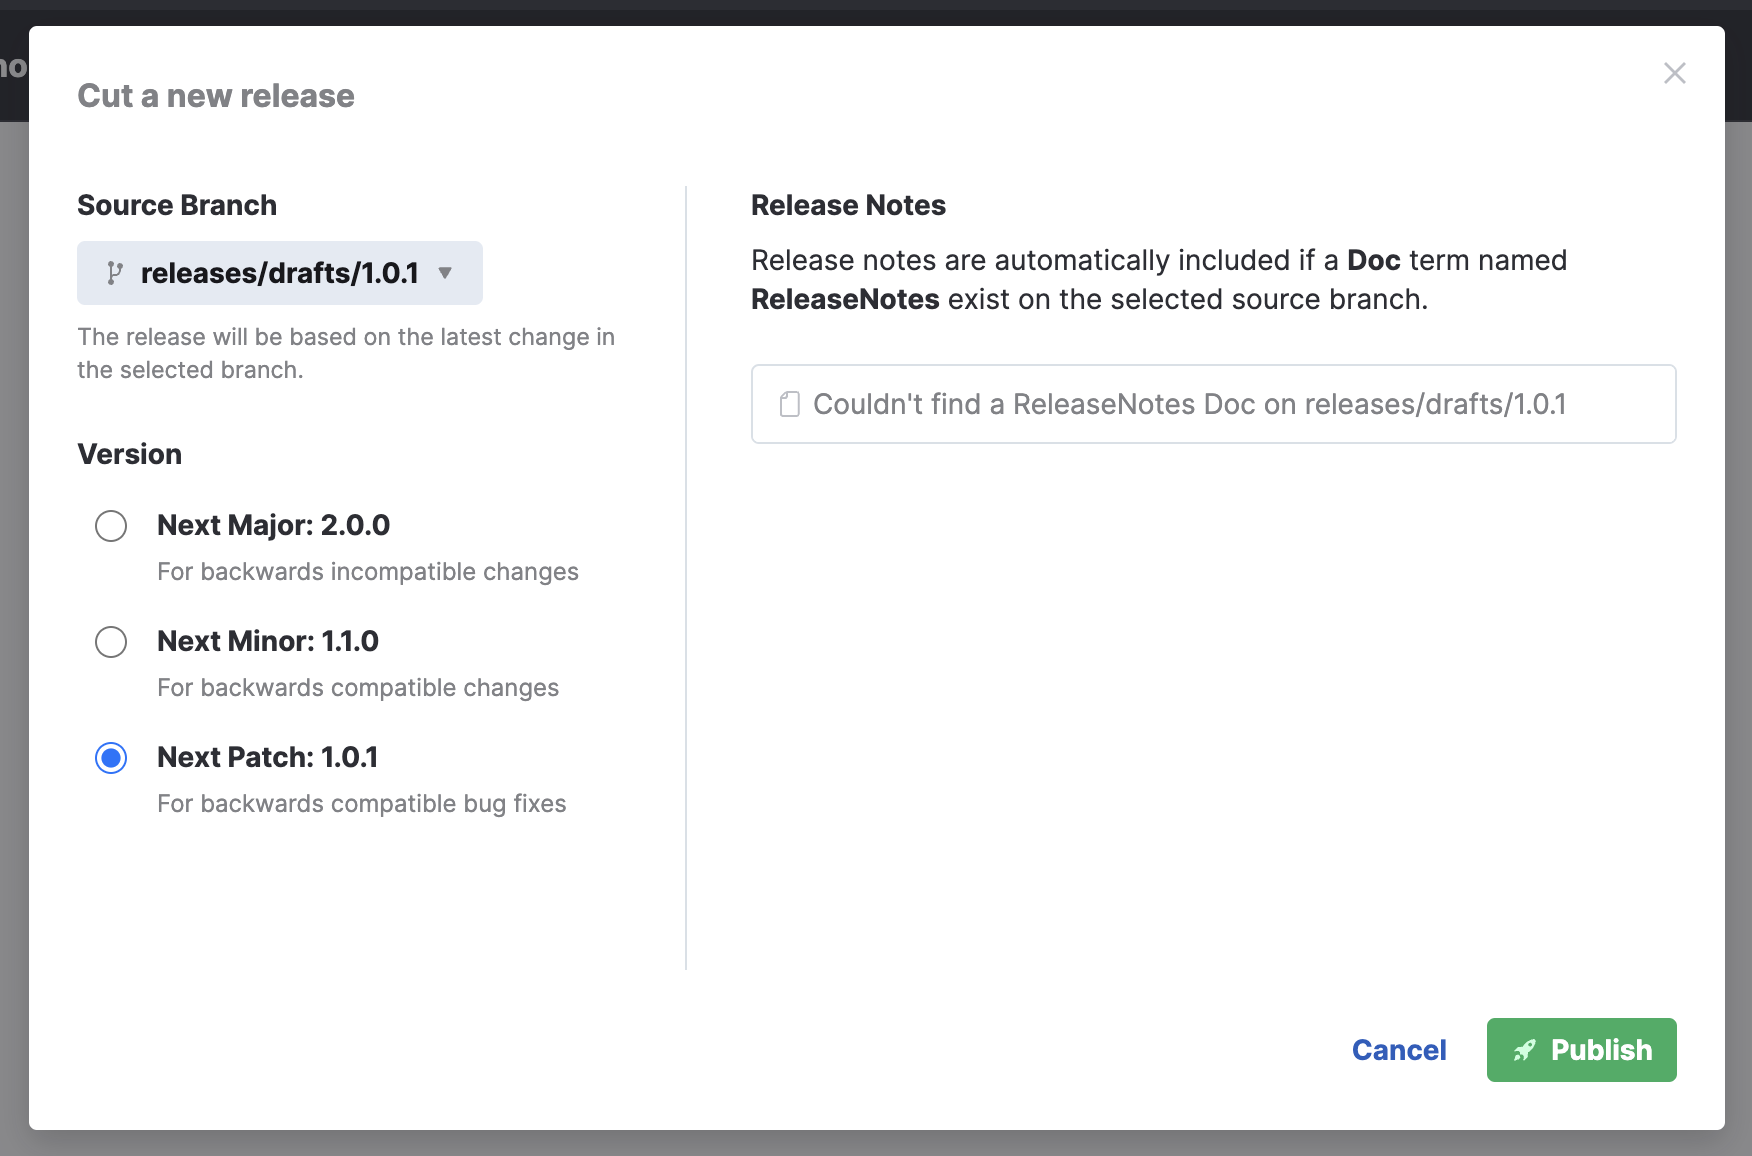
Hit publish and Unison Share will create a new release for you! The release process will squash the unneeded codebase history when it creates the release, so users of your library will have a compact version to depend on.
Creating a release draft in the UCM
You can create a release from any branch of a project, but it's common to create a release from the main branch in the UCM. To start a release, use the release.draft command and enter the version number of the release you want to create.
myProject/main> release.draft 1.0.0This will create a new branch called /releases/drafts/1.0.0.
You may want to add a Doc term called "ReleaseNotes" to this branch at this point to describe the changes in this version. Upon publication, if Unison Share finds a term called "ReleaseNotes" in a release branch, it will display the notes for others to benefit from.
ReleaseNotes = {{

  * Added function {List.map}
  * Updated function {List.filter}
  ...

}}
After you're done adding the release notes, push the branch to Unison Share and head to the project url given in the console.
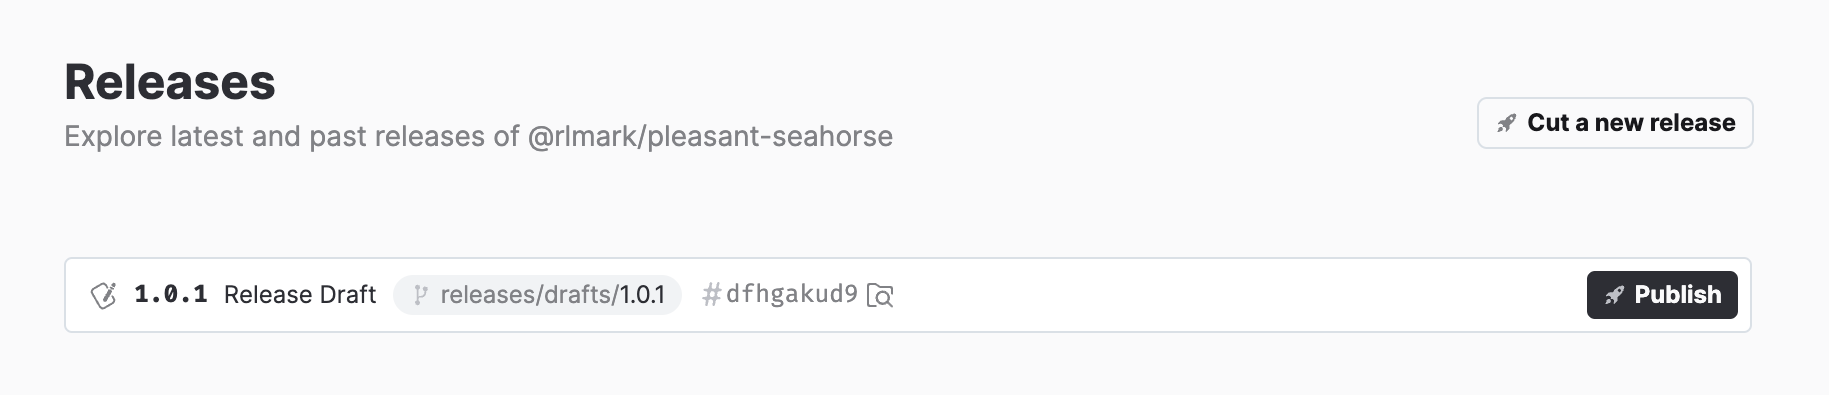
myProject/releases/drafts/1.0.0> pushThe "releases" tab for the project has a special section for "draft" releases at the top if a branch matching the release draft naming conventions is found. Click publish for the release draft in question to open up a modal for confirming the desired version. Otherwise you can use the "cut a release" button found in the "releases" page to make a release at any time.
Unison Share supports semantic versioning for releases, so pick one of the options given in the modal.
When you're ready, hit "Publish" and Unison Share will add your new version to the list of releases for a project.
Reviewing a PR
Once a contributor has created a contributor branch and pushed it to Unison Share, their contribution will show up in the project's Unison Share contributions page.
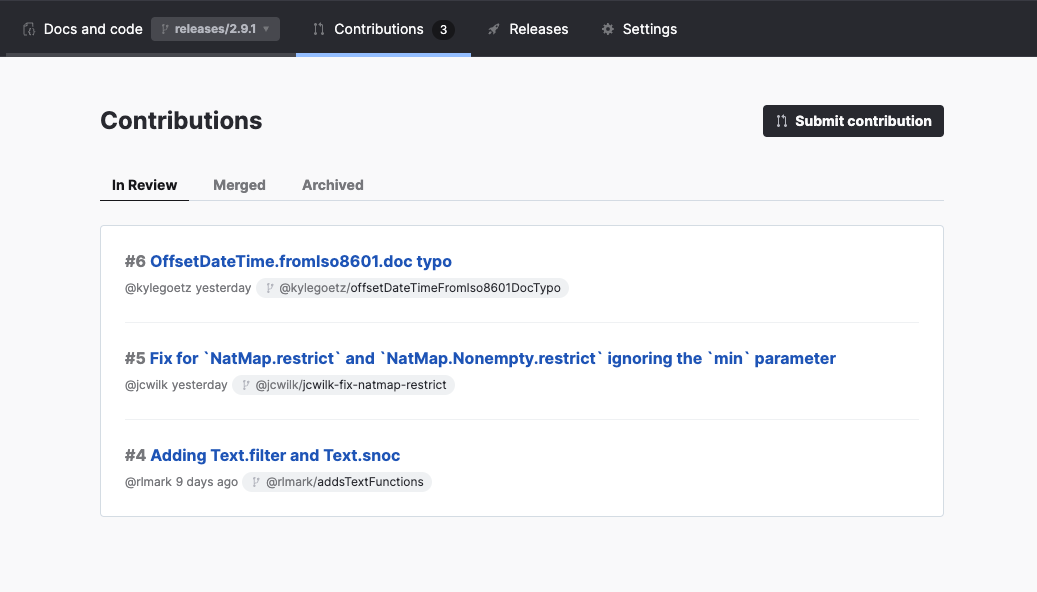
Click on the contribution you'd like to review and you can see a description of the changes and a panel showing the impacted code across the two branches.
If the merge can be performed safely, you can click the green "Merge" button to bring the change set into the parent branch.
Otherwise, you may need to clone the branch locally to review and merge it in.
myProject/main> clone /@contributor/featureBranch
myProject/@contributor/featureBranch> switch main
myProject/main> merge /@contributor/featureBranch
Resolve the conflicts and push your changes back to Unison Share to make them available to others or create a release!
Creating a PR
Assuming you have cloned another users project, you can create a PR by creating a branch with your Unison Share handle as a prefix. This branch should contain your suggested changes. This is called a contributor branch.
@libraryAuthor/project/main> branch /@yourHandle/featureBranchNext, push your branch to Unison Share. You'll see a link to the branch url in the UCM.
@libraryAuthor/project/@yourHandle/featureBranch> pushHead to the project's "contributions" tab click on the "submit contribution" button.
Select the branch containing your change and the target branch for your desired PR, then add a title and description of your changes.
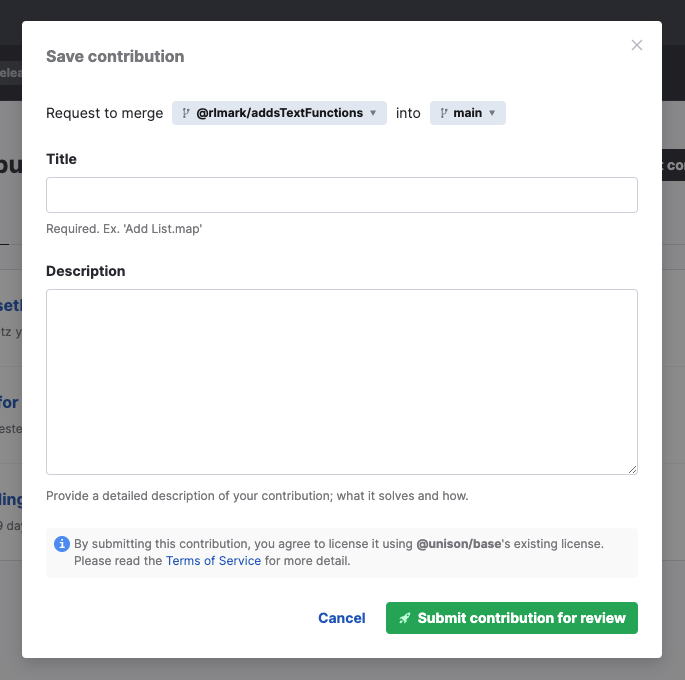
Hit submit and you should see your PR in the list of contributions added to the main contributions page.
Finally, you can message our library authors in the #library channel in the community slack to make sure they see your PR! In the future, we'll be adding automated notifications for PRs.
Deleting a remote branch from Unison Share
Deleting a remote branch from Unison Share can only be done via the Unison Share UI. Head to the project's home page and click on the drop-down menu where the current branch name is displayed. You'll see a short list of all the remote branches for the project. At the bottom of the drop down menu head to "View all branches" and from there you can delete your desired branch. You cannot delete branches that you do not own.